
Last updated: August 2026.
If you registered for the DELE last year, forget everything you knew: registration has changed. The Instituto Cervantes has launched a brand-new online store, tienda.cervantes.org, and the whole process now goes through it (the official exams website redirects you to the store). In Spain, registration is online only.
And fair warning: the new website has its quirks. There's a screen that looks broken, an account that gets created in a way that confuses everyone (it never asks you to create a password when you register: you create it afterwards from a link sent to your email) and one small slip that can make you pay for the wrong exam centre.
I'm Mar, an accredited DELE examiner, and I went through the entire process from start to finish (Spain → Madrid → DELE B2 → October 2026 session), taking a screenshot of every screen. In this guide I'll walk you through it, step by step, until your place is booked. And we start where everyone should start: creating the account.
Would you rather watch it? Here you have the whole registration, screen by screen, in under 7 minutes (the video is in Spanish):
Before you start: what to have at hand
- Your passport or NIE. You'll be copying your details LETTER BY LETTER (I'll tell you why that matters so much in a moment).
- A credit or debit card to pay (payment goes through Banco Santander's gateway; Correos prepaid cards are also accepted).
- A personal email address that you check often. The Cervantes requires a single-person email: it's used to create your account, and it's where the password link, the receipt, your exam summons and your results arrive.
Remaining dates and deadlines in 2026 (Spain)
- October session: Friday the 16th (B1, B2 and C1) and Saturday the 17th (A2). Registration open until 2 September.
- November session: Friday the 13th (A2) and Saturday the 14th (A1, B1, B2, C1 and C2). Registration open until 30 September.
The 2026 fees in Spain by level: A1 → €112 · A2 → €138 · B1 → €173 · B2 → €204 · C1 → €225 · C2 → €240. You'll find the full official calendar for the year, with every date and level, in When is the DELE and how can you register?
One piece of advice before we go on: don't leave it until the last day. Registration closes on those dates, but exam centres have quotas… and they run out earlier.
Part 1: create your account (do this first)
You could start searching for your exam right away, but I'd advise against it: when you reach the cart, the website will demand an account anyway, and plenty of people lose everything they had selected along the way. Besides, the Cervantes account is created in an unusual way, and it's worth doing calmly. It takes five minutes.
Step 1: register with your email

On tienda.cervantes.org, click the user icon (top right) and choose to register. It only asks for your email address and basic details. And here comes the part that confuses everyone: registration never asks you to create a password. Don't worry, you haven't skipped anything: the password is created in the next steps.
Step 2: «Recupera tu cuenta»: enter your email and the code
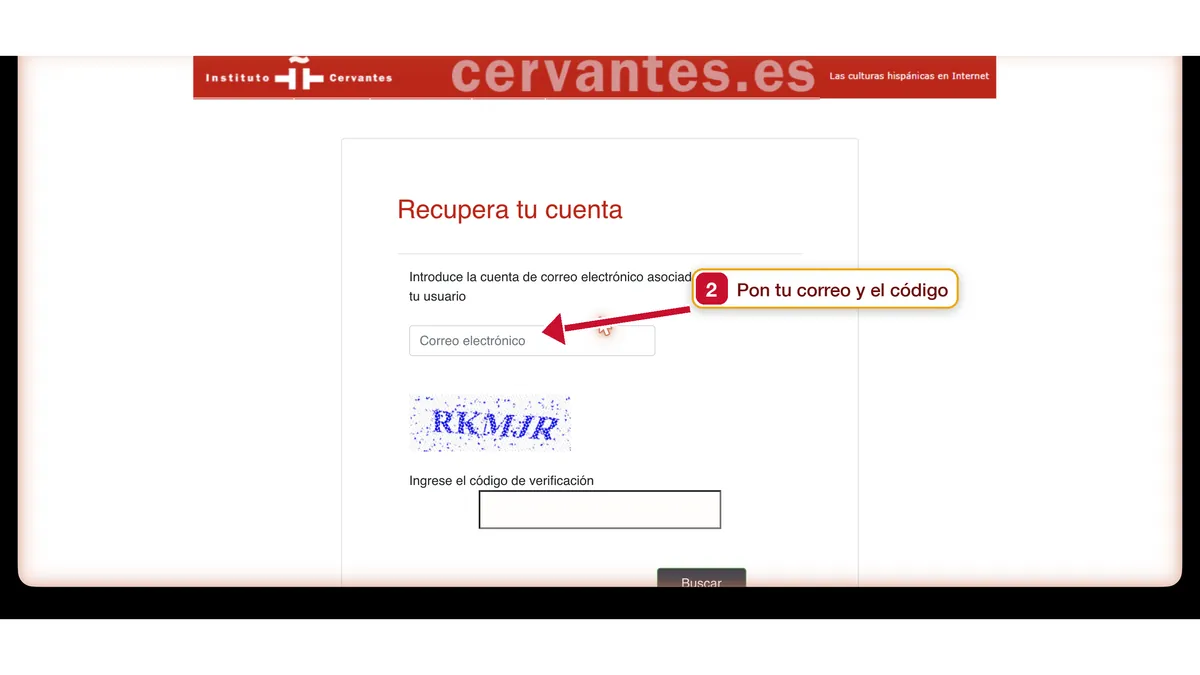
Even though the title says «Recupera tu cuenta» (“Recover your account”), this screen is also how you create your password for the first time. Type the same email you registered with, copy the verification code (the blue captcha) and click «Buscar» (Search).
Step 3: Cervantes sends you a link

You'll see this message in green: «Hemos enviado un enlace de validación a su correo electrónico» (“We've sent a validation link to your email”). Time to check your inbox.
Step 4: open the email and click the link
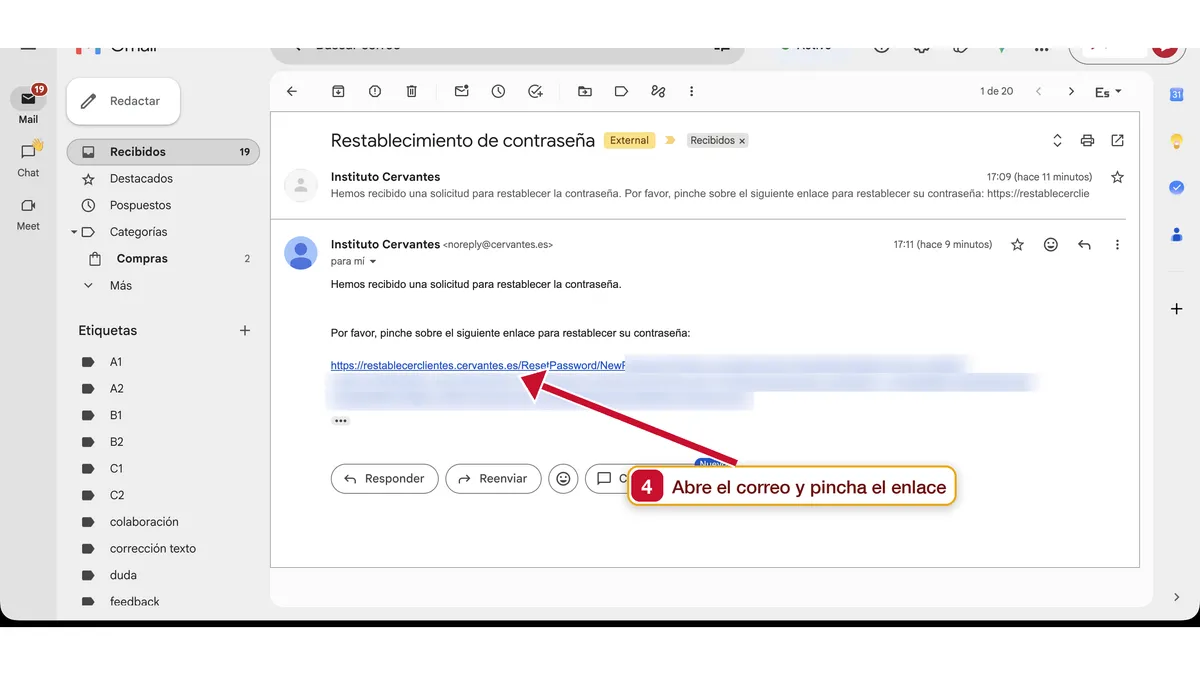
The sender is noreply@cervantes.es and the subject is «Restablecimiento de contraseña» (“Password reset”). Click the long link in the message. If it doesn't arrive within a couple of minutes, check your spam folder; and note that the link expires, so use it as soon as you can.
Step 5: create your password

The link takes you to this screen: type your new password twice and click «Cambia la contraseña» (“Change the password”). This will be your Cervantes account password from now on: keep it somewhere safe, because you'll need it to download your registration receipt and, months later, your results.
Step 6: go back to the store and log in

Go back to tienda.cervantes.org and log in with your email and your new password from the top right corner. If you can see your name up there, you're in: account ready. Now, let's go and get your exam.
Part 2: find your exam and book your place
Step 7: choose your country (and don't panic if the store looks empty)

Does the store look empty, with no exams? It isn't broken. It shows nothing until you tell it where you are, because it needs to assign you a “reference Instituto Cervantes”. At the top left, open the country selector, type the first letters and pick yours. In my example, España. And if the site loads in English and you'd rather use Spanish (or vice versa): at the top right, under “Global | ES/EN”, switch the language.
Step 8: choose your city

Same with the city: in my example, Madrid. One detail to note: this city only sets your “reference” Cervantes centre. You'll choose the actual exam centre later on, so don't worry if your town doesn't appear.
Step 9: click «Ver DELE»

Now the home page shows the product cards. Click «Ver DELE» (See DELE). Don't confuse it with the CCSE, which is the constitutional-knowledge test for Spanish nationality (a different exam).
Step 10: choose your level

You've reached the exam search. Open the «Examen» filter and select the level you're taking. And if you're still torn between two levels, my usual advice: take a level test first and clear up your doubts before paying.
Step 11: choose the exam session
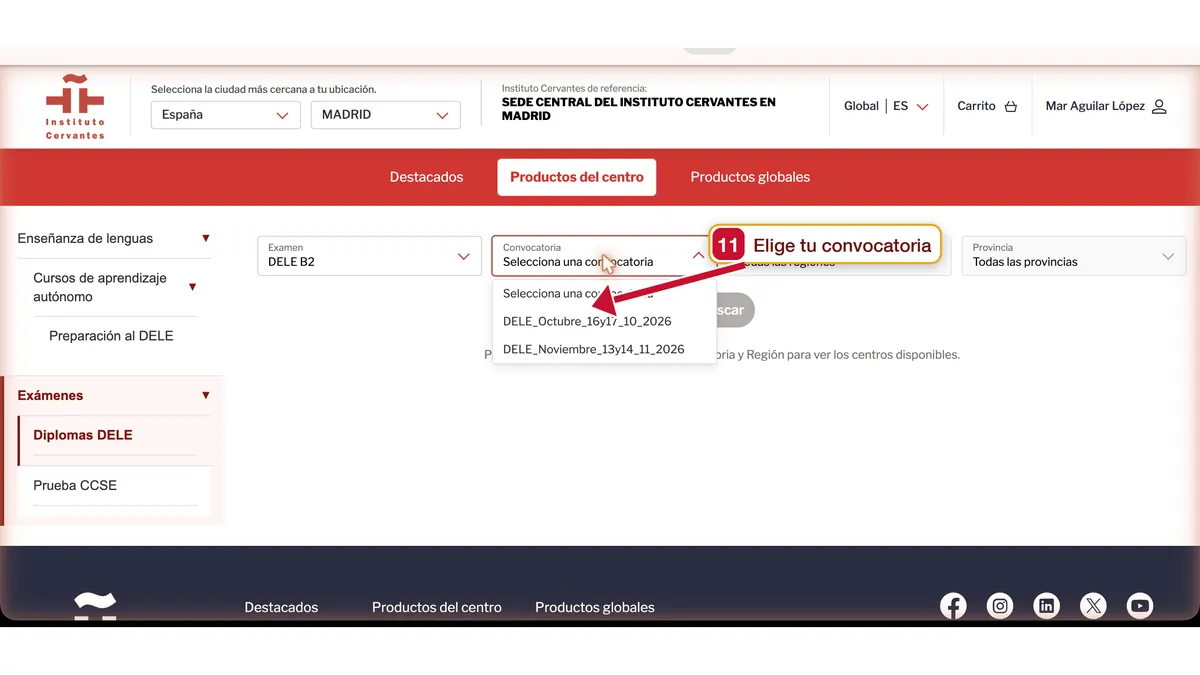
The names are a bit cryptic («DELE_Octubre_16y17_10_2026»), but look at the month and the year. Keep in mind that not every level is offered in every session, and that each session has its own registration deadline: pick the one that fits your preparation… without leaving it until the end.
Step 12: region, province… and «Buscar»

Choose your region (in my example, «Madrid, Comunidad de»): it's required for the «Buscar» button to activate. The site has been gaining filters lately: besides the region you can now narrow down by province and centre type, very handy in large regions. When you're set, click «Buscar» (Search).
Step 13: the available exam centres

Here are the actual centres where you can sit the exam. In my latest search (B2, October, Community of Madrid) four came up: Élite Lenguas, Universidad Complutense, Universidad Francisco de Vitoria and Universidad Rey Juan Carlos. And note something important: the list changes over time —in July there was a fifth centre that no longer appears— one more reason not to leave it until the end. Expand each centre to see its address, contact details and date.
Step 14: quotas in sight and «Ver detalles»

Inside each centre you'll see the table with the session, the date and the quotas. Green means places available («Plazas disponibles»); orange means «Últimas plazas», last places (yes, it's real: I came across it while preparing this guide). Click «Ver detalles» (See details).
⚠️ Examiner's tip: when the product page opens, scroll down to «Detalles del centro de examen» and check that it's YOUR centre. While preparing this guide, the site opened a different centre from the list on me. Twice. Always double-check before paying.
Step 15: review the exam page

The exam page gives you all the key information: the actual price (€204 for the B2 in Spain), the registration period (for October, until 2 September) and the test dates. And here comes something that surprises everyone: in my example, the written exam is on 16 October… but the oral exams run «del 12/10/2026 al 6/11/2026». Yes: your oral exam can fall on a different day, even BEFORE the written one, and the exact date is assigned by the centre. Don't book flights or make plans until you have your summons. Before paying, also review what to examine closely in the DELE terms and conditions (changes, refunds, personal data).
Step 16: «Añadir producto» and «Ir al carrito»

Click «Añadir producto» (Add product). Since your account is already created and you're logged in (thank you, steps 1 to 6), you'll see this confirmation right away. Click «Ir al carrito» (Go to cart). If you had skipped registration, this is where the website would stop you cold and send you off to create an account, losing your selection.
Step 17: the cart: for you or for someone else?

The cart has three steps (review, forms and payment). In the first one there's an option almost nobody knows about: you can mark the registration «Para mí» (for me) or «Para otra persona» (for another person). In other words, you can register your partner, a family member or a student from your own account. Tick the right box and click «Siguiente» (Next).
Step 18: the registration form (letter by letter)
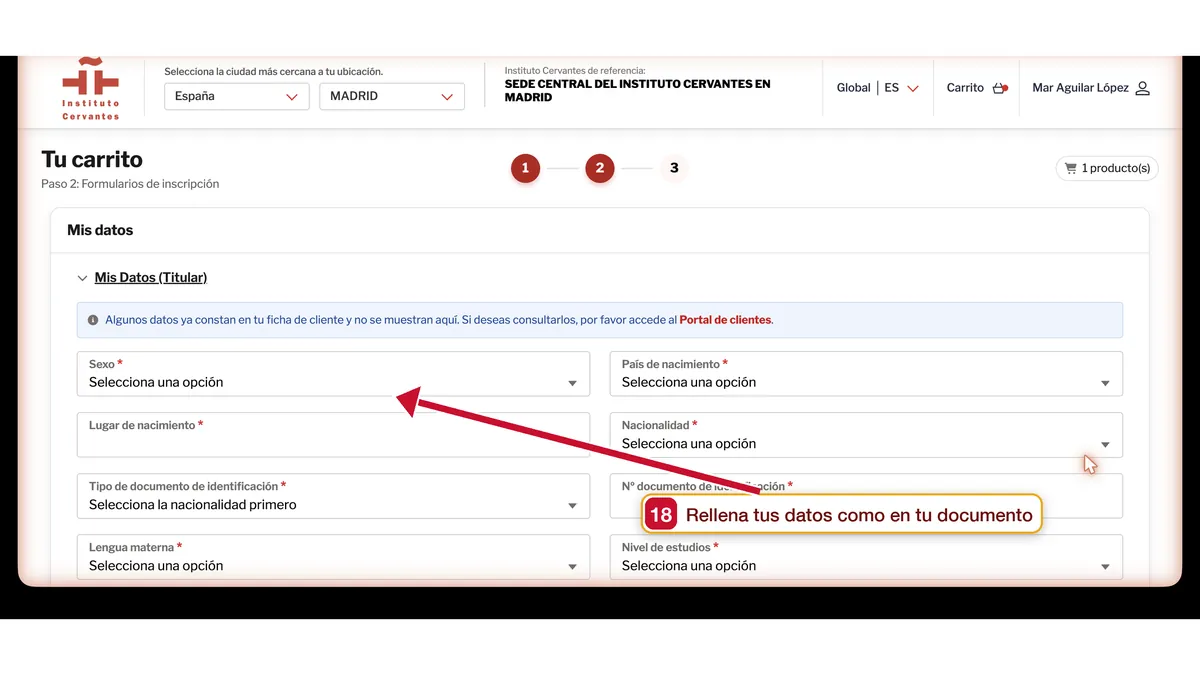
Step 2 of the cart is the real registration form: sex, country and place of birth, nationality, ID type and number, mother tongue, level of education, country of residence and town. This is where you take out your passport or NIE and copy everything letter by letter: the diploma is linked to that document. At the end there are three consent boxes (information from the IC and use of materials): they're optional. Click «Siguiente» and you'll reach step 3, card payment through Banco Santander's gateway.
After payment: your receipt
Once you've paid, download the registration receipt (resguardo) from your user area. That receipt is your proof of registration: keep it safe. On exam day you'll need three things: the receipt, your original ID document (the same one you used to register) and the summons the centre will send you.
The 3 mistakes that can cost you your registration
- Details that don't match your ID. Incomplete surnames, a mistyped NIE, a shuffled date of birth… The exam is linked to that document, and correcting it later is a bureaucratic process. If you're taking it for Spanish nationality, it can also affect your application. Copy everything letter by letter.
- A shared email, or one you don't check. The Cervantes requires a single-person email, and everything arrives there: your password link, the receipt, the summons and your results.
- Waiting until the last day. October registration closes on 2 September, but centre quotas can run out earlier, and even the list of centres can shrink from one month to the next: in Madrid I've seen a centre disappear between July and August.
Frequently asked questions about DELE registration
Where do I register for the DELE?
In the Instituto Cervantes' official online store: tienda.cervantes.org. In Spain, registration is online only; outside Spain you can also register directly at your exam centre.
How do I create the account if I was never asked for a password?
That's how this website works: you register with just your email and then, on «Recupera tu cuenta», you enter that email, receive a link by email and create your password there. With it you can log in at the top right.
Can I register someone else?
Yes. In the cart, each exam can be assigned «Para mí» (for me) or «Para otra persona» (for another person), filling in the actual candidate's details. Very useful for families and teachers.
How much does it cost to register for the DELE in 2026?
In Spain: A1 → €112 · A2 → €138 · B1 → €173 · B2 → €204 · C1 → €225 · C2 → €240. Outside Spain the fees vary by country (you can see them on each exam's page).
Until when can I register for the DELE in 2026?
Until 2 September for the October session and until 30 September for the November session. But remember: centre quotas can run out before the deadline.
Can I change my session, centre or level after paying?
It's not automatic: in general, once the registration period has closed there are no changes, and while it's open they depend on availability. I explain it in detail in what to examine closely before paying.
When do the DELE results come out?
About two months after the exam, and about three in the May and November sessions. They arrive by email with your grade certificate and, if you pass, your digital diploma. I explain everything in DELE results: when they come out and how to check them, and if you want to understand how it's graded, here's how the DELE is graded.
DELE or SIELE?
They're different certificates: the DELE is an official diploma by level and the SIELE is a multi-level exam. If you're not sure which suits you, here are the differences between DELE and SIELE.
Your place is booked. Now what?
Now comes the important part: getting to the exam and earning your APTO. In my DELE preparation courses I'll be with you all the way to exam day, drawing on my experience as an accredited examiner. And if you're still not sure about your level, start with the free level test.
¡A por el DELE! 💪